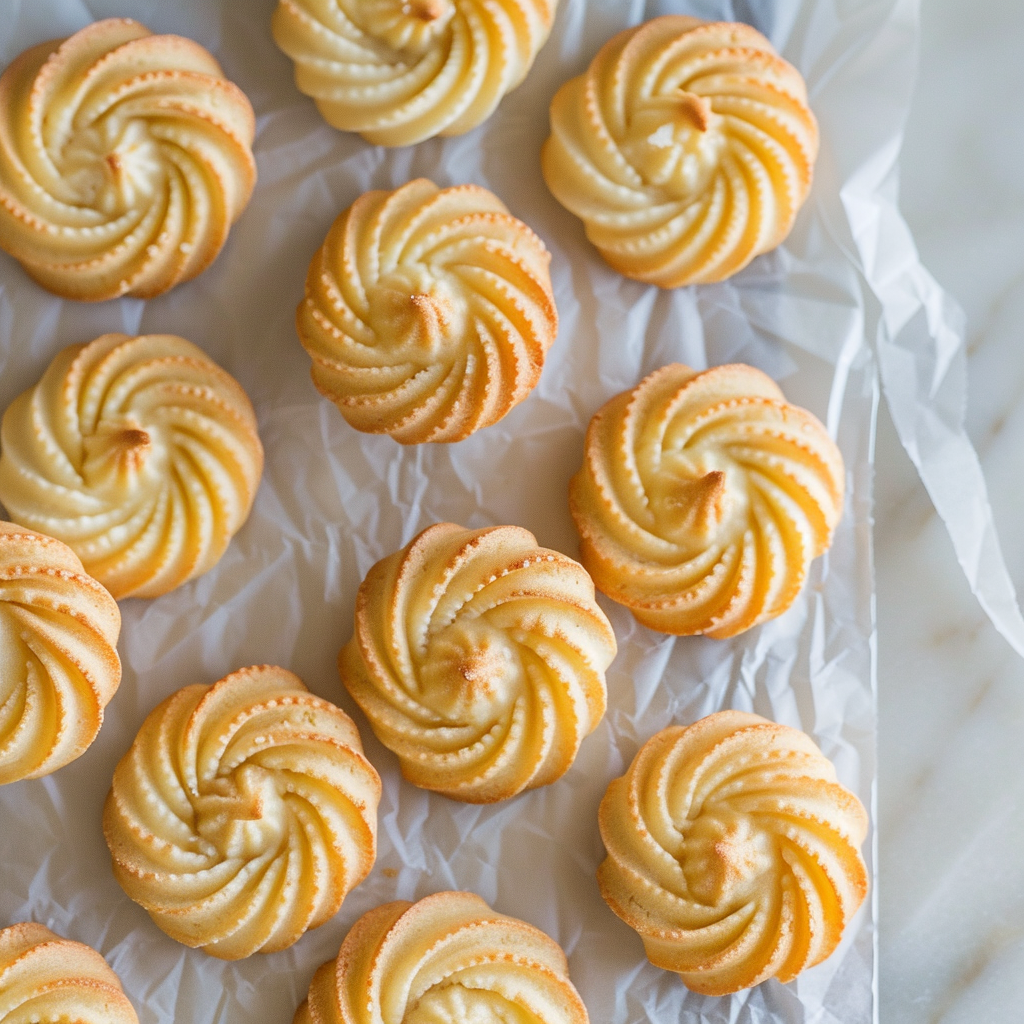
Danish Butter Cookies (Classic Melt-In-Your-Mouth Recipe)
There’s something timeless and comforting about Danish Butter Cookies. The moment you take a bite, they practically melt on your tongue—rich, buttery, lightly sweet, and delicately crisp around the edges. These cookies aren’t flashy or complicated, and that’s exactly what makes them so special. They rely on simple ingredients, careful technique, and that unmistakable buttery flavor that has made them a classic for generations.
Often associated with holidays, cozy afternoons, and elegant cookie tins, Danish butter cookies are the kind of treat that feels both nostalgic and refined. They pair beautifully with coffee or tea, make thoughtful homemade gifts, and are perfect for serving when you want something understated yet undeniably delicious. While they may look fancy with their swirled shapes, they’re surprisingly approachable to make at home—even if you’re not an experienced baker.
What sets a truly great Danish butter cookie apart is texture. The outside should be lightly crisp, offering a gentle snap, while the inside remains tender and delicate. Achieving that balance is easier than you might think when you understand a few key details—like using high-quality butter, properly creaming the dough, and piping it with care. When done right, these cookies bake up beautifully golden, holding their shape and delivering pure butter flavor in every bite.
This recipe is designed to help you recreate that classic bakery-style experience in your own kitchen. Whether you’re baking for the holidays, preparing a cookie platter, or simply treating yourself to something special, these Danish butter cookies are the kind of recipe you’ll come back to again and again. Simple, elegant, and irresistibly good—this is butter cookie perfection.
Why You’ll Love It
Danish butter cookies are the definition of classic baking done right. One of the biggest reasons you’ll love this recipe is its simplicity. With just a handful of pantry staples, you can create cookies that taste elegant, rich, and bakery-quality. There’s no overpowering sweetness, no heavy spices—just pure, buttery flavor that lets each ingredient shine.
Another reason this recipe stands out is texture. These cookies strike that perfect balance between crisp and tender. The edges bake up lightly golden with a delicate snap, while the centers remain soft and melt-in-your-mouth tender. That contrast is what makes Danish butter cookies so addictive and timeless.
This recipe is also incredibly versatile. While the base dough is simple, it’s easy to customize with chocolate dips, flavored extracts, or festive decorations. That makes it ideal for holidays, special occasions, or everyday treats when you want something a little refined but still comforting.
Finally, these cookies feel special without being difficult. The piped shapes look impressive, yet the process is straightforward once you know a few key tips. Whether you’re baking for guests, gifting homemade cookies, or simply enjoying a quiet moment with coffee or tea, this recipe delivers consistent, elegant results every time.
Ingredients + Tips
Because Danish butter cookies rely on so few ingredients, quality really matters here. Butter is the star of the recipe, so using high-quality, unsalted butter makes a noticeable difference. It should be softened but not melted—soft enough to cream smoothly, yet firm enough to help the cookies hold their shape when piped.
Sugar adds sweetness without overpowering the buttery flavor. Powdered sugar is often preferred in butter cookies because it creates a finer, more tender crumb than granulated sugar. Make sure it’s sifted to avoid lumps in the dough.
Eggs help bind the dough and add richness. Use room-temperature eggs so they incorporate evenly into the butter mixture. Cold eggs can cause the dough to separate or become uneven.
Flour provides structure, but overmixing once it’s added can lead to tougher cookies. Mix just until the dough comes together. If the dough feels too stiff to pipe, letting it sit at room temperature for a few minutes can help.
A touch of vanilla enhances the flavor without overpowering it. You can also experiment with almond or lemon extract for subtle variations, but classic vanilla keeps the cookies traditional.
Steps (Dough & Baking)
Start by creaming the softened butter and powdered sugar together until the mixture is light, smooth, and fluffy. This step is crucial, as it helps create the tender texture that Danish butter cookies are known for. Take your time here—proper creaming makes a big difference.
Once the butter and sugar are well combined, add the egg and vanilla extract. Mix until fully incorporated, scraping down the sides of the bowl to ensure everything blends evenly.
Gradually add the flour, mixing on low speed just until the dough comes together. The dough should be soft and smooth but thick enough to hold its shape when piped. Avoid overmixing, as this can lead to dense cookies.
Transfer the dough to a piping bag fitted with a large star tip. Pipe swirls or circles onto a parchment-lined baking sheet, leaving a little space between each cookie. If the dough is difficult to pipe, allow it to warm slightly at room temperature.
Bake until the edges are lightly golden. The cookies should not brown too much; a pale golden color ensures they stay tender inside. Let them cool on the baking sheet briefly before transferring to a rack to cool completely.
Variations
Danish butter cookies are incredibly adaptable, making them perfect for customization. For a chocolate version, dip half of each cooled cookie into melted dark or milk chocolate and let it set. This adds richness and visual appeal.
You can also add citrus zest, such as lemon or orange, to the dough for a bright, aromatic twist. Almond extract is another popular variation that pairs beautifully with the buttery base.
For festive occasions, sprinkle the cookies with coarse sugar before baking or decorate with chocolate drizzle and sprinkles after cooling. You can even sandwich two cookies together with jam or chocolate spread for an elegant twist.
If you prefer a slightly crunchier cookie, bake them a minute or two longer, watching closely to avoid overbrowning.
Storage & Reheating
Once completely cooled, Danish butter cookies store beautifully. Place them in an airtight container at room temperature, where they’ll stay fresh for up to a week. Keeping them well sealed helps preserve their delicate texture and flavor.
For longer storage, these cookies can be frozen. Arrange them in a single layer in a freezer-safe container, separating layers with parchment paper. They’ll keep well for up to three months. Thaw at room temperature before serving.
Reheating isn’t usually necessary, but if you enjoy them slightly warm, a few seconds in a low oven will restore a just-baked feel without drying them out.
Serving Suggestions
Danish butter cookies are perfect with a hot cup of coffee, tea, or hot chocolate. Their mild sweetness and rich butter flavor complement warm drinks beautifully.
They also shine on dessert platters, cookie trays, and holiday spreads. Because they’re not overly sweet, they pair well with richer desserts like brownies or cakes, balancing out the flavors.
For gifting, arrange them in decorative tins or boxes lined with parchment paper. Their elegant appearance and classic taste make them a thoughtful homemade gift for any occasion.
Danish Butter Cookies
Ingredients
Method
- Preheat oven to 350°F (175°C) and line baking sheets with parchment paper.
- Cream butter and powdered sugar until light and fluffy.
- Add egg and vanilla extract; mix until fully combined.
- Gradually add flour and salt, mixing just until dough comes together.
- Transfer dough to a piping bag fitted with a large star tip.
- Pipe swirls onto prepared baking sheets.
- Bake for 10–12 minutes, until edges are lightly golden.
- Cool briefly on the baking sheet, then transfer to a wire rack.
Final Thoughts
Danish butter cookies are a reminder that some of the best recipes don’t need to be complicated. With simple ingredients and careful technique, you can create cookies that feel timeless, elegant, and deeply satisfying. Every bite delivers that unmistakable buttery richness paired with a tender, delicate crumb that practically melts in your mouth.
What makes this recipe truly special is its versatility. It works just as well for quiet afternoons as it does for celebrations and holidays. You can keep it classic, dress it up with chocolate or citrus, or personalize it to suit your style—yet the heart of the recipe always remains the same: pure butter flavor and perfect texture.
These cookies also have a way of bringing people together. They invite you to slow down, enjoy the process of baking, and savor the results with loved ones. Whether you’re sharing them with guests, giving them as gifts, or enjoying them fresh from the oven with a warm drink, they create moments of comfort and joy.
Once you master this recipe, it’s one you’ll return to again and again. Reliable, elegant, and endlessly delicious, Danish butter cookies deserve a permanent place in your baking repertoire. They prove that classic recipes endure for a reason—and this one is truly worth keeping.